

Wittworkshop
Bow Tie Master Template
Bow Tie Master Template
Couldn't load pickup availability
Bow Tie Master Template
The Chisel-Free Bow Tie System
Make matching bow ties and mortises with one template and your router—without chiseling square corners.
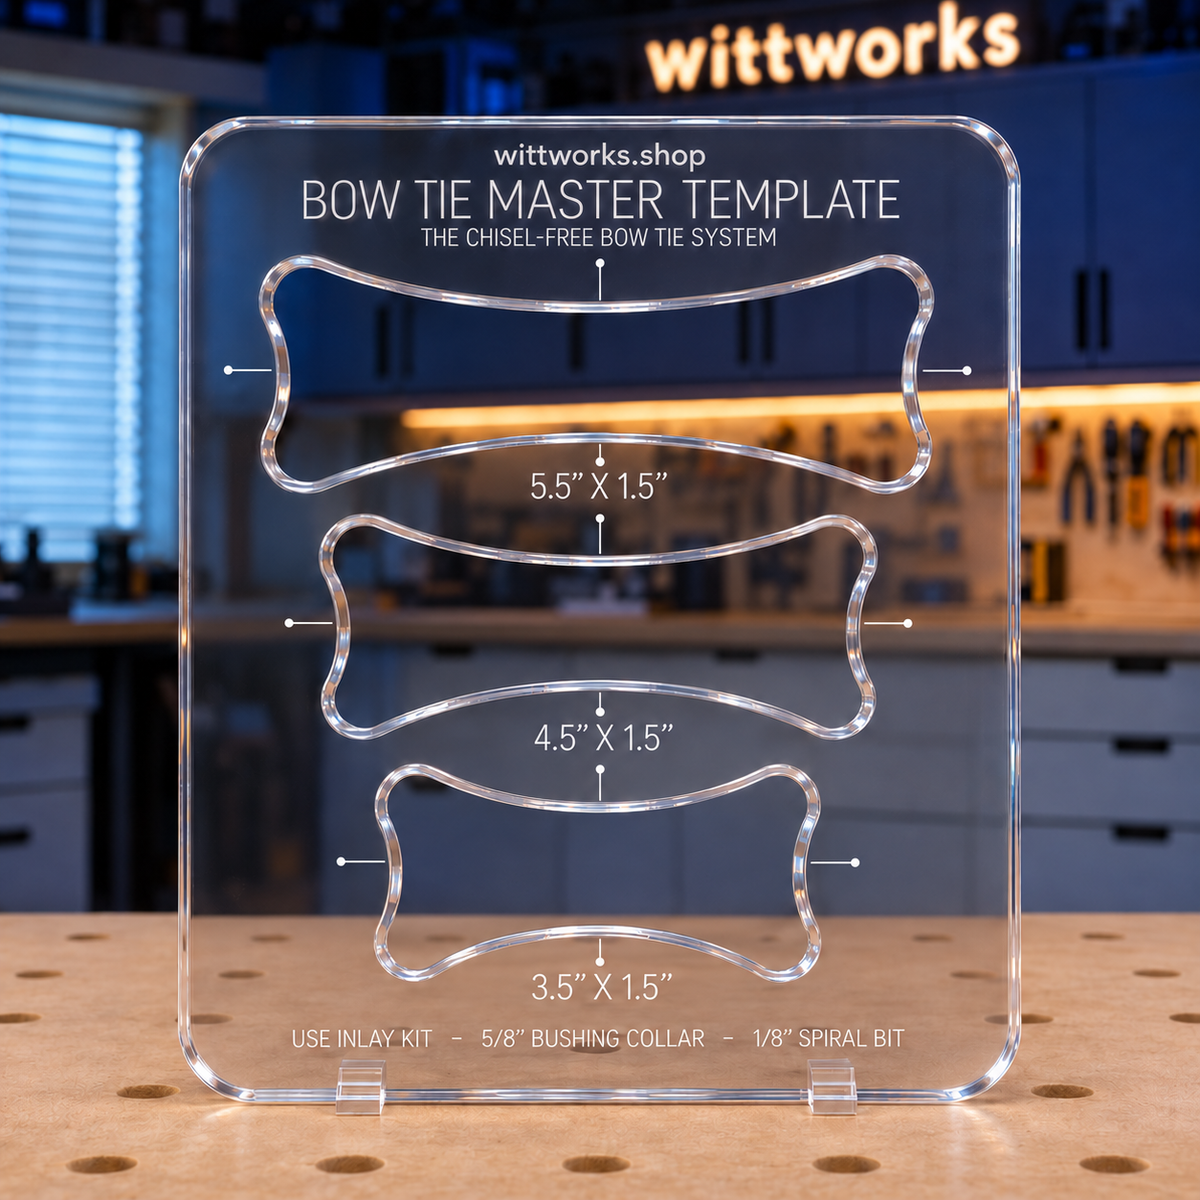
The Wittworks Bow Tie Master Template uses a removable-collar inlay kit to cut both parts. Route the mortise with the collar installed, then remove the collar to cut the matching bow tie using the same opening.
Three sizes, clear acrylic, and engraved centerlines make it easy to choose your bow tie and position it where you want it.
Template only. The required SpeTool inlay kit and double-sided woodworking tape are sold separately.
What You’ll Need
-
SpeTool Router Inlay Kit — This is the kit we tested. Use its ⅛″ spiral bit and smaller removable collar. The kit includes the guide bushing, collars, bits, and centering pin.
-
Double-sided woodworking tape — To secure the template and hold the bow tie stock to a sacrificial backer. We prefer Spectape. Xfasten is fine too.
-
A compatible router and baseplate — Your router must accept the kit’s guide bushing and the bit’s ¼″ shank. Some routers require an adapter or replacement baseplate. A plunge router is recommended.
-
Bow tie stock, a sacrificial backer, and wood glue.
Use the ⅛″ cutting-diameter bit—not the ¼″ bit also included in the SpeTool kit. Center the guide bushing with the supplied alignment pin before routing.
How It Works
1. Route the Mortise
Choose a size and align the engraved centerlines over your layout marks. Secure the template with double-sided woodworking tape. With the smaller removable collar installed, use the ⅛″ bit to route the perimeter and clear the recess in shallow passes.
2. Cut the Matching Bow Tie
Secure your bow tie stock to a sacrificial backer, including the area beneath the finished bow tie. Attach the template and remove the collar, leaving the guide bushing installed. Follow the same opening with the same ⅛″ bit to cut out the bow tie in shallow passes.
No router table required.
3. Fit, Glue, and Finish
Check the fit before adding glue. Light sanding may be needed depending on your setup and material. Glue the bow tie into place, allow the glue to cure, then trim or sand it flush.
The rounded profile eliminates the need to square the mortise corners with a chisel.
Make a test bow tie and mortise in scrap before routing your project.
What’s Included
-
One precision laser-cut ⅜″ cast acrylic template
-
8″ × 9″ overall dimensions
-
Three openings for cutting both bow ties and matching mortises
-
Laser-engraved centerlines for alignment
-
Engraved size and tooling references
Approximate finished bow tie sizes with the specified setup:
| Size | Length × maximum width |
|---|---|
| Small | 3½″ × 1½″ |
| Medium | 4½″ × 1½″ |
| Large | 5½″ × 1½″ |
Finished dimensions and fit vary slightly with the bit, bushing, and routing setup. Bow tie thickness and mortise depth depend on your stock and the cutting reach of your tooling.
Router, inlay kit, tape, wood, and glue are not included.
Made in Texas
Designed and manufactured in our Texas shop from premium cast acrylic. Built for live-edge slabs, tabletops, furniture repairs, and decorative inlays—where a well-placed bow tie can become part of the design.
Share